คำตอบที่ 11
แบบพี่ดาวเหนือว่าก็ไม่เลวเลยครับ (แปลไม่ค่อยเคลียเท่าไหร่) แต่ปัญหาคือหมุนยากมากพังก่อนแน่ แล้วก็ไม่รู้ว่าต้องหมุ่นเท่าไรดี น่าคำนวณและลองดูเหมือนกัน
Project CJ-7 ~ Scout II Dana 44 Axles Swap onto a CJ-7 Frame
Castor Adjustment Options
This option will not correct ZERO degree castor but will help
fine tune castor and correct minor Camber problems as well.
Purchased from:
The Scout Ranch
125 Autumn Lane
Tullahoma, TN 37388
Phone: 931-455-0759
http://www.cafes.net/epp/TSRhomepage.htm
With the swap of a set of 1976 Scout II Dana 44 axles, the front axle's knuckles had a castor of 0° from factory. The CJ-7 axles had a castor of 4° to 5° of positive castor (meaning the wheels tilted rearward by 4-5°). Only the last year of the Scout did IH put any castor (2°) in it's front axles and I wasn't lucky enough to find a set from that year. What castor does for the front axle is help it self- center which basically means it will naturally lean towards pointing straight ahead while turning. Without any castor (0°) the steering would have a tendency to wander even when pointing straight ahead and would not move towards center while exiting a turn.
There are a few solutions to zero degrees of castor. First is to shim the axle on the leaf springs causing the axle to lean rearward. A side-effect of shims is that this also causes the pinion to point towards the ground. The Dana 44 front axle's pinion from the Scout already points slightly towards the ground so causing it to point further to the ground is not a desirable thing. For one the drive shaft will be put on a harder angle and two, pointing it towards the ground puts it further in harm's way while on the trail. Because the spring pad on the passenger side of the Scout's Dana 44 front axle is part of the housing, you can't cut off the spring pads and rotate just the pads as in some wider front solid axles.
Another option is to rotate the inner knuckles rearward by the desired amount of castor. This is not as easy as it sounds. The inner knuckle is welded to the axle tube so the weld needs to be ground off carefully and the knuckle has to either be pressed off hydraulically or whacked off with a hammer after the weld has been removed. Then the knuckles need to be rotated evenly by the desired amount of castor and re-welded. This is the best solution to the castor problem but not the easiest to requiring some knowledge of measuring castor and welding. Ultimately, this is the option I will have to do for the Scout Axle. The castor correctors here will help fine tune the castor and help adjust the camber if needed.
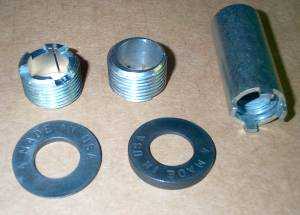
Another solution I found to gain some castor in the front Dana 44 axle also happens to be the easiest to do. I found something called Castor Correctors though a company called "The Scout Ranch" which require no serious modifications and can be re-adjusted or even removed if need be. What the Castor Correctors do is replace the upper ball joint guide that screws down into the knuckle with one that looks the same on the outside but has an angled hole on the inside (See illustration A1). Using the Castor Correctors tilts the upper ball joint up to 1.5 degrees in the desired direction and can be used to make small corrections to castor down to 1/8th degree.
A1 - Guide on left is stock. Guide on right is a Castor Corrector. Notice the off center hole.
Installation of Castor Correctors was not difficult although a few things should be taken into consideration. First thing to consider is that if your upper and lower ball joints are old, now is the time to replace them. The Scout Ranch can supply a tool for removing the ball joint guide however the tool (or any tool for that matter) can not handle the torque it required to back out the guide off of the upper ball joint without taking the tension off the guide. Possibly some axles do not have the tension that my Dana 44 had but if they did not have that tension, then there could be some possible wear associated with the guide or ball joint stud. The Guide that you will remove has a slot in it allowing it to expand in the threads of the knuckle locking it in place. In order to remove the tension, you have to remove the bolt off of the upper ball joint. Under that bolt is where the ball joint guide is. I decided to replace both the upper and lower ball joints at this time so installation of the Castor Correctors was just as easy as putting the stock guide back on. At the bottom of this page is some tips on replacing the upper and lower ball joints. If you are planning to reuse your ball joints I think that the easiest way to take the tension off of the guide is to loosen the lower ball joint nut (if you can get to it), and then remove the upper ball joint nut. Use a ball joint tool to press down on the upper ball joint. it probably won't pop out easy so a few good whacks with a hammer onto the out steering knuckle should persuade it to back out just enough to take the tension off the upper ball joint guide. Once the tension is off the guide, you can use the tool to back out the guide and replace it with the new Castor Corrector. Next, tighten up your lower ball joints again. Next you will insert the Castor Correctors. The Castor Correctors, when being turned in, will appear to wobble the upper ball joint and outer steering knuckle. This is how you will adjust your castor. Here's another thing to remember so pay attention and you won't make the same mistake I did. When turning in your Castor Correctors keep in mind that you want the ball joint stud to lean forward when looking at the top. This will cause the bottom of the ball joint stud to be as rearward as possible. You can gage it by the slot in the Castor Corrector which should be towards the rear of the vehicle. This gives you castor is the proper direction if your application is the same as mine. Now here is the thing. While turning in your Castor Correctors turn it in until you feel it get tight BUT DO NOT TIGHTEN IT. If you can not turn the slot easily to the rear most part of the knuckle's threads, you should back up to the last time around. You may think that you'll be able to turn it in far enough to get the slot around again to lean the stud but it gets tight quick and if you don't make it around to where you want the Castor Corrector to stop you'll have to go though the whole process again. The tool can not back out an over tightened Castor Corrector. Don't try too hard if you tighten it too much or you ruin the tool. You'll have to loosen the lower ball joint again and use a ball joint remover tool to press it down in order to be able to back out the Castor Corrector. TRUST ME. I been there, done that.
Once you have the Castor Corrector in place, put the shimmed washer on the ball joint stud. This shim is to give the bolt a flat place to seat. So depending on your degree of needed castor you will put the shimmed washer so that thinner side is towards the side that the stud is leaning, opposite the slot in the Castor Corrector. All that is left is to tighten down on the ball joint bolt to the desired torque specs and put the cotter pin in. You may have to hold the shimmed washer as you tighten the ball joint nut or it may spin. I had to try a few times. Overall that's it. It's not as hard as it sounds. It only took a few hours and that included replacing the ball joints and having to remove the tension twice on one side but you won't have to worry about that, right?
Upper and Lower Ball Joint Replacement
To replace the ball joints I disassembled the hubs, removed the bearings and the axles from the housing. With a clear view of the ball joints I removed the nuts and used a ball joint remover to press out the lower ball joint from the inner knuckle. The trick here was to put as much pressure on the lower ball joint and then give the upper ball joint stud a whack with a hammer. Both ball joint studs popped out. Then removal of the upper ball joint stud guide was easy using the tool acquired from The Scout Ranch.
Next step for my process was to replace the ball joints. After removing the snap rings, I used a hammer to whack out the ball joints from below the knuckle. For the upper ball joint I used a metal shaft and ran it though the lower ball joint hole (after removing the lower ball joint). I wrapped a rag around the shaft where it ran though the hole to protect it from damage while hammering away at the upper ball joint. I then used a bench vise and various pieces of metal to press the new ball joints into the outer knuckle.